
cabinet assembly guides
video and step-by-step guides
Remodel like a pro with our painted cabinetry and easy to follow tutorials. If you run into any issues, our American-based customer service professionals are here to help!
measure
your kitchen
work with your designer
work one-on-one with our cabinetry experts
assemble
your dream kitchen
how to measure your kitchen
the first step to any successful home improvement project taking down accurate measurements. Check out our kitchen measuring guide to make sure your remodel gets off on the right foot.
base cabinet assembly guide
download PDF Manualinstructions
- Empty the package contents and prepare the hinges to be secured in place. Attach glide bracket to the back panel with screws. Place hinges in position and secure with screws. Secure face frame to door with screws. Place bumpers on cabinet door edges. Apply glue to face frame dado. Insert cabinet side into face frame dado. Secure assembly blocks with staples
- Repeat step 1 for the other side panel.
- Apply wood glue to the bottom dadoes and insert the bottom panel. Secure assembly blocks to the bottom panel with staples.
- Attach assembly blocks to the toe kick with staples. Attach the toe kick to the cabinet box with assembly blocks and staples.
- Apply wood glue to the top dadoes for support panels.Insert support panels and attach with assembly blocks and staples.
- Apply wood glue to the back panel and position it in place. Secure back panel with staples at a 45-degree angle. Secure back panel with screws in the pilot holes at a 45-degree angle.
- Insert glides into brackets. Secure the glides with screws.
- Position shelf clips in place. Position shelf in place on top of the shelf clips.
- Apply wood glue to the drawer front dovetails. Attach the drawer box to the drawer front and secure the dovetail by tapping the pieces in place with a mallet. Repeat on the other side. Be sure to wipe away any excess wood glue as you go.
- Insert the bottom panel into the drawer box. Apply wood glue to the back dovetails on the drawer box. Attach the drawer box back to the drawer box and tap into place with a mallet. Be sure to wipe away any excess wood glue.
- Attach bumpers to the back of the drawer front. Secure the drawer glide clips to the bottom of the drawer box with screws Insert the drawer box into the cabinet box so that the clips attach to the drawer glides.
- Enjoy your new cabinet box!
60+
sizes & options available
jig
guides to help ensure the perfect fit
easy reach cabinet assembly guide
Download PDF manualinstructions
- Clamp the two sections of the face frame together and screw them together with 1 ¼” screws on both ends.
- Apply wood glue to the face frame dado. Insert cabinet sides and staple at a 45-degree angle into the face frame.
- Apply Wood Glue and insert the cabinet bottom into the dados. Then, staple them at a 45-degree angle at the bottom into the cabinet sides. Using the assembly blocks, secure the bottom to the face frame and both sides by placing a pair of staples into each leg of the block.
- Notice that one piece of the toe kick is ½” longer than the other piece. At a 90-degree angle, line up the end of the longer piece on top of the end of the shorter piece. Staple along the end and then reinforce it with two screws.
- Attach assembly blocks to the toe kick at each end and in the center of each section. Then, line the toe kick up to the bottom of the cabinet and secure with the assembly blocks.
- Install shelf clips into the sides and insert the shelf into the cabinet.
- ***If you are installing a Lazy Susan Kit, please follow the Lazy Susan Kit instructions and install before proceeding to the next step.***
- Apply Wood Glue and insert the cabinet top into the dados. Then, staple them at a 45-degree angle at the top into the cabinet sides. Using the assembly blocks, secure the top to the face frame and to both sides.
- Insert the cabinet back into the dados of the cabinet sides. Using a jig, mark the cabinet back. Then screw the back to the top and bottom.
- Install the 2 ¼” hinge blocks onto the cabinet side up against the face frame.
lazy susan insert >>
instructions
- Place the lazy susan shelf on the easy reach shelf, lining up the corner of the hardware plate to the pie cut out on the easy reach shelf.
- Line up the pre-drilled hole on the shelf with the hole located on the underneath hardware plate, then secure in place with a screw.
- Spin the shelf to line up the other three holes and secure them with screws.
- After you have secured the hardware plate to the shelf, spin the lazy susan to ensure that it spins correctly.
- Repeat the steps to install the lazy susan shelf to the bottom of the easy reach cabinet.

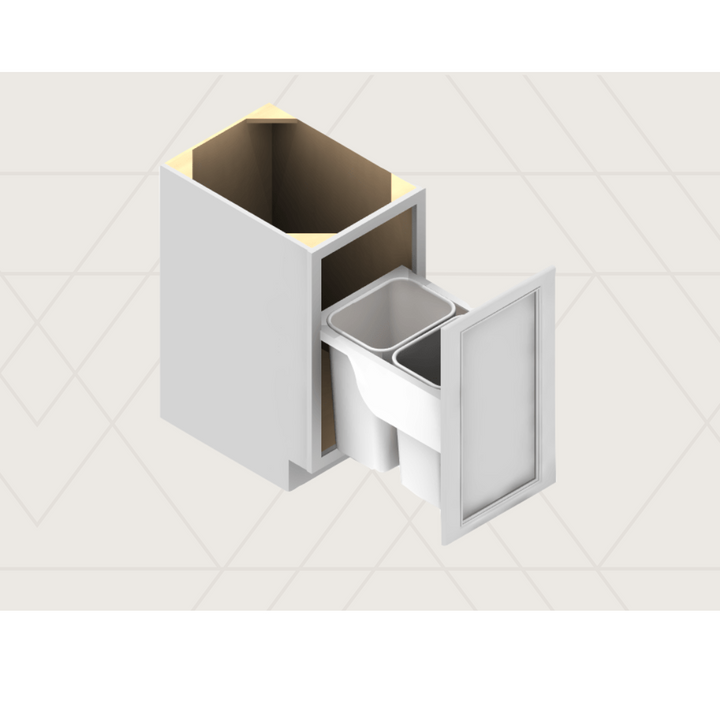
trash can base cabinet assembly guide
download PDF manualinstructions
- Empty the contents of the package and find the back panel and brackets. Then, attach the brackets to the back panel using screws. Then, place the face frame face down and apply wood glue to the dadoes.
- Insert the cabinet side panels into the face frame side dadoes. Secure the side panels using assembly blocks with staples.
- Insert the bottom panel into the side panel dadoes. Then, secure the bottom panel using assembly blocks with staples.
- Attach assembly blocks to the toe kick with staples. Then, secure the toe kick to the side panels using the assembly blocks with staples.
- Secure the top stretchers on the cabinet box using staples. Then, secure the stretchers using assembly blocks with staples.
- Apply wood glue to the back panel and position it in place. Secure the back panel with staples. Mark the bottom of the back panel using the wall cabinet jig. Then place screws along the line made by the jig. Next, secure the back panel with screws at a 45-degree angle in the predrilled holes.
- Insert the drawer glides and secure them with screws. Be sure to line the drawer glide up with the predrilled holes on the inside of the side panels. Ensure the drawer glides are plumb and even, then secure the drawer glides to the back panel using screws.
- Attach side insert panels to back insert panels with 1” brad nails. Then, secure the panels together using the predrilled holes and screws. Next, attach the drawer glides to the insert panels using the predrilled holes and screws. Be sure the drawer glides are even and have consistent spacing before moving on.
- Place the cabinet door into position and secure it with a bar clamp. Attach the insert to the cabinet door using screws along the sides. Then, attach bumpers to the door corners.
- For a single trash bin, use the top panel for the insert. For a two trash bin configuration, leave the top panel off the insert.
- Enjoy your new trash can base cabinet!
trash can insert >>
instructions
- Place the cabinet door face down and position the jig to make a mark 1 ¾” up from the bottom and centered between the right and left sides. Then, position the insert front panel along the marks made by the jig and secure it in place using screws.
- Apply wood glue to the front panel dovetails and insert the side panels. Then, tap the dovetails into place using a mallet.
- Insert the bottom panel into the side panel dadoes. Next, apply wood glue to the back panel’s dovetails and attach them to the side panels. Tap the dovetails together with a mallet.
- Attach the drawer glide clips to the bottom of the insert using screws. Insert the trash can divider and secure it in place using screws in the predrilled holes.
- Attach bumpers to the back of the cabinet doors corner. Next, place the insert into the cabinet box so that the glides and clips are secured.
- Enjoy your new trash pull-out!
open shelf vanity assembly guide
download PDF manualinstructions
- Position glide bracks on the back panel and secure with screws.
- Insert dowels into the vanity legs. Then, tap them into place with a mallet Screw feet into the bottom of the vanity legs.
- Attach legs to the back panel and tap into place with a mallet.
- Attach side panels to the vanity legs and tap into place with a mallet.
- Attach the front legs to the side panels and tap into place with a mallet.
- Attach face frame to the front legs and tap into place with a mallet.
- Attach the shelf to the vanity legs and tap into place with a mallet Use a bar clamp to tighten the legs.
- While clamped, attach assembly blocks on the inside of the vanity box where the sides and legs meet with staples.
- Apply wood glue to the drawer front dovetails. (Note: The drawer box front is pre-attached to the drawer head).
- Insert the drawer box side pieces into the face frame dovetails. Then, use a mallet to tap the dovetails into place.
- Insert the bottom panel into the drawer box.
- Apply wood glue to the center cutout panel dovetails.
- Attach sides to center cutout and tap into place with a mallet.
- Insert center cutout into the drawer box bottom.
- Apply wood glue to the 2 back panels’ dovetails and insert them into the drawer box back. Tap them into place with a mallet.
- Secure the bottom panel to the side panels with staples at a 45-degree angle.
- Secure with drawer glide clips to the drawer box with screws.
- Place bumpers on the drawer box.
- Apply wood glue to the front panel dovetails of the second drawer box front panel.
- Attach the side panels to the front panel dovetails and tap into place with a mallet.
- Position the side panels and insert the bottom panels into the side panel dadoes.
- Apply wood glue to the back panels and attach them to the side panels. Tap them into place with a mallet.
- Use the pilot holes to secure the side panels to the front panel.
- Use the pilot holes to secure the drawer box to the face frame.
- Secure the drawer glide clips to the bottom of the drawer box with screws.
- Place bumpers on the back of the drawer front, and then insert your drawer boxes so that clips are attached to the drawer glides.
- Enjoy your new open-shelf bathroom vanity!